Configuring the FaxPress Premier Archive
Configuring the Archive is divided here into three sections:
| ■ | Accessing the Active Directory Configuration Utility (See Accessing the FaxPress Premier Configuration Wizard.) |
| ■ | Creating and Configuring Access or SQL Database (See Connecting FaxPress Archive to a DSN (SQL Databases).) |
| ■ | Configuring the Archive Directory Properties. (See Configuring the Archive Program’s Properties.) |
Accessing the FaxPress Premier Configuration Wizard
To access the FaxPress Premier Archive service, follow these steps:
| 1. | Login as Administrator to FaxPress Plus. (Start>Programs>FaxPress Plus>FaxPress Plus) |
| 2. | Open the FaxPress Plus Administration folder. |
| 3. | Select the Embedded Services folder. |
| 4. | Right-click on the Archive service and select Configuration. |
Creating and Configuring the MS Access or SQL Database
To create and configure the Archive’s MS Access or SQL database, used to store information about the fax transactions (e.g., sent/received, sender/recipient, remote terminal ID, etc.), follow these steps:
| 1. | The Mode of Operation window offers you a choice of two modes: Administrative View mode and All User View mode. |
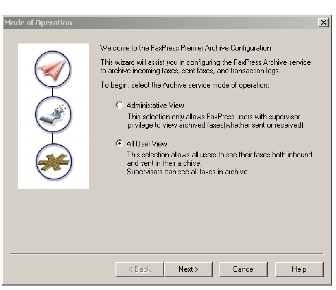
The purpose of the Administrative View mode is primarily for off-line, long-term storage with backups done once a day. In this mode, the faxes in the archive can only be accessed by FaxPress Premier Administrators. In the All User View archive mode, the faxes are continuously moved into the database and are easily viewed, searched, and filtered by FaxPress Plus end users. Select a mode, then click Next.
Since Archived faxes get deleted from the Incoming Fax Queue, they will only be visible to users through the Archived Received Faxes folder in FaxPress Plus, and only if the All User View mode is selected.
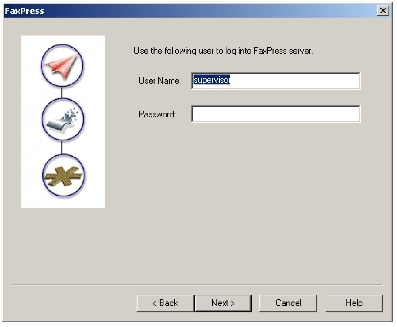
| 2. | Enter the FaxPress Premier User Name and Password the Archive will use to log into the FaxPress Premier. This account should have Administrator privileges. |
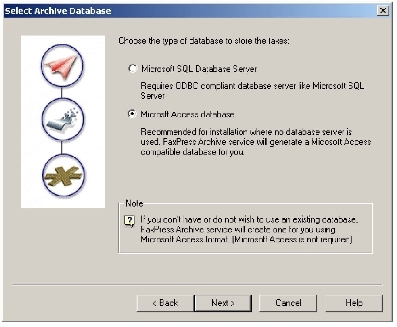
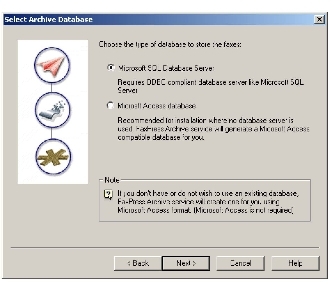
SQL Database Server – Use this option if an MS SQL server is available. This will give users the performance, reliability and security that are available with the database server.
Microsoft Access database – Use this option if you want to use an Access database, or if you do not have access to a relational database server. An installation of the Microsoft Access program is not required. A new database file with the appropriate tables will be created by the installation process.
The FaxPress Premier administrator can at anytime use the FaxPress Premier Archive configuration program to specify a different database, but the information from the old database will not be imported into the new one.
| 4. | If you select Microsoft Access, go to Configuring Archive for a Microsoft Access Database. If you select SQL Database Server, proceed to Connecting FaxPress Archive to a DSN (SQL Databases). |
Configuring Archive for a Microsoft Access Database
To use a Microsoft Access database for storage of the Archive information data, follow these steps:
| 1. | If you selected Microsoft Access in The Select Archive Database dialog box prompts you to select the type of database to use archive data storage. When archiving faxes, FaxPress Premier Archive generates fax archive information data and, if configured to do so, transaction log files. , the Select New or Existing Database screen is displayed.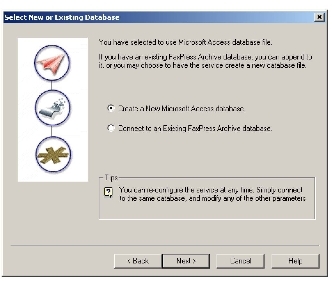 |
Select Connect to an Existing FaxPress Archive database if an archive database already exists and you just want to change other parameters unrelated to the database. Or, select Create a New Database for a new Access database.
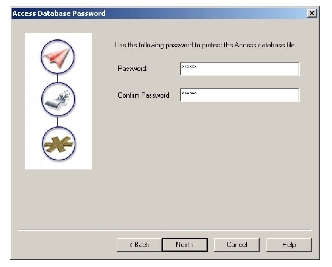
| 2. | Enter a password for the new or existing Access database. Click Next>. |
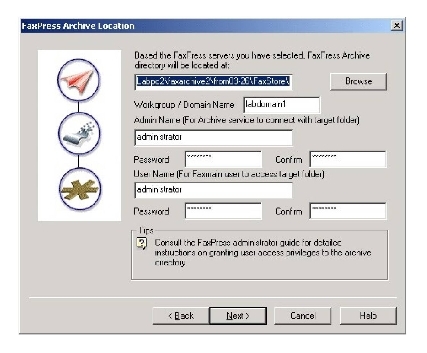
| 3. | The Fax Archive Location information screen displays the location where the archived faxes are stored. Use Browse to select a new location. |
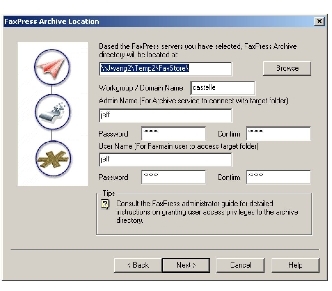
In the Workgroup/Domain Name field, enter the domain or workgroup for the Admin Name and User Name accounts.
In the Admin Name field, enter a network administrator or user account name with full access rights to the directory where the archived faxes will be stored. The Premier Archive service will use this account name to access the target folder.
In the User Name field, enter a network user name with read access rights to the directory where the archived faxes will be stored. FaxPress Plus will use this account to retrieve archived faxes for users.
Configuring Archive for an MS SQL Database
This section describes the procedure for configuring an MS SQL Archive database. This section only applies if the Microsoft SQL Database Server option was selected in The Select Archive Database dialog box prompts you to select the type of database to use archive data storage. When archiving faxes, FaxPress Premier Archive generates fax archive information data and, if configured to do so, transaction log files. , as shown below.
To configure the FaxPress Premier Archive for an MS SQL database, follow these steps:
| 1. | After Microsoft SQL Database Server is selected, the ODBC DSN dialog box will appear, with the current ODBC connect string displayed in the Select a Data Source Name . . . field. |
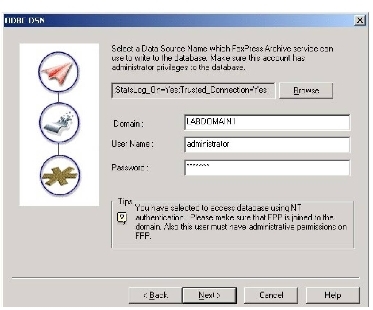
The connect string is generated automatically when a DSN is selected and a connection to the server is successful.
Domain – Enter the name of the database domain.
User Name and Password – Enter a name and password for the Archive to use to log into the SQL server and create tables. The login account used by the Archive must have permission to create tables in the database. The same DSN will be used by the archive program to connect to the database to enter data. If the right DSN is not displayed, or you want to select or create an alternate DSN, click the Browse button and follow the instruction in Connecting FaxPress Archive to a DSN (SQL Databases).
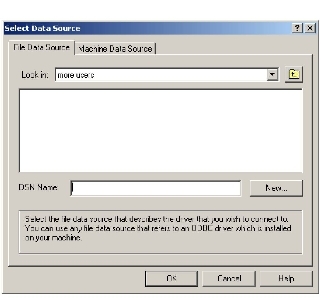
| 2. | Select the File Data Source tab and either browse to select an existing ODBC driver, or use the New button to create a new one. |
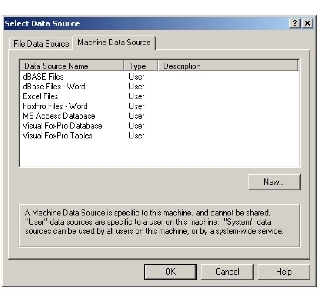
| 3. | Select the Machine Data Source tab and use the New button to add a new one to the list. |
| 4. | Use the FaxPress Archive Location window to either confirm or change the information you’ve entered, and click Next>. |
Configuring the Archive Program’s Properties
After you’ve selected and configured an Access or SQL database, the Archive wizard will finish the configuration process by prompting you for FaxPress Premier server selection and archiving properties.
The Sent Faxes Archive dialog box provides the settings for outgoing faxes.
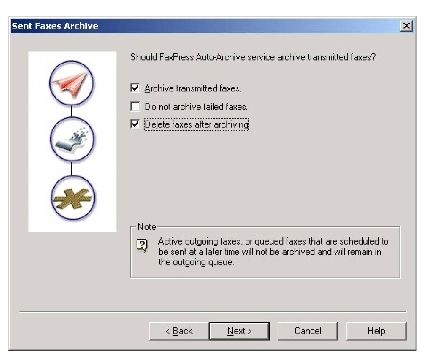
Archive Transmitted Faxes - Selecting this option means all successful and failed faxes will be archived.
Do not archive failed faxes - Selecting this option means successful faxes will not be archived.
Delete faxes after archiving - Selecting this option means transmitted faxes will be automatically deleted from the outgoing queue after they are archived.
If you choose to archive sent faxes, the FaxPress Premier server Advanced Functions parameters will automatically be set to Keep Successful Outgoing Faxes. Otherwise, the sent faxes are automatically removed from the outgoing queue after a successful transmission. See Advanced Functions for more information .
| 5. | The Received Faxes Archive window lets you choose whether or not to archive received faxes. |
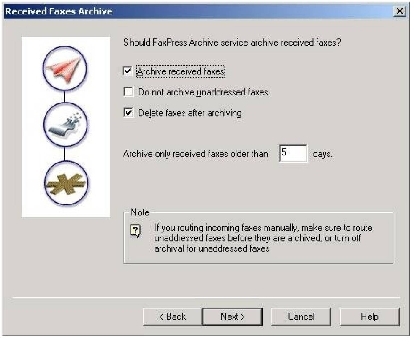
Archive received faxes – Select this option to archive received faxes. If unchecked, received faxes will not be archived.
Do not archive Unaddressed faxes – If this option is checked, then all faxes in the Unaddressed mailbox will not be archived. This option allows unaddressed faxes the chance to be routed before they are archived. After they are routed, the other archiving options are enforced.
Delete faxes after archiving – If this option is selected, and Archived faxes are deleted from the incoming queue after archiving, they will only be visible to users through the Archived Received Faxes folder in FaxPress Plus, and only if the All User View mode is selected.
Archive only received faxes older than x days: This specifies how long a fax must be in the incoming queue before it is archived. This ensures that a fax is in the incoming queue for a certain amount of time before it is moved into the archive.
| 6. | The Transaction Logs Archive window lets you choose whether or not to archive transaction logs. Selecting Archive Transaction Logs will include both transmitted and received logs. There is no option to archive only transmitted or only received logs. |
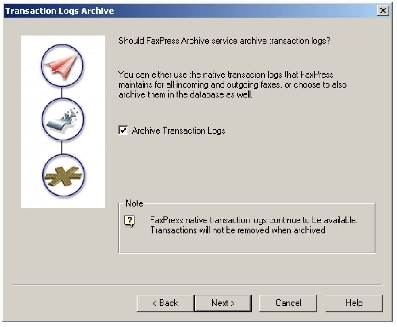
FaxPress Premier transaction logs are not deleted at the completion of the archive process. When to delete transaction logs is specified in the Storage Reclamation settings of the FaxPress Premier Server Properties. See Storage Reclamation .
| 7. | The Archive Options dialog box allows you to select the archive storage format for your faxes and the user name and password for accessing your archive database. |
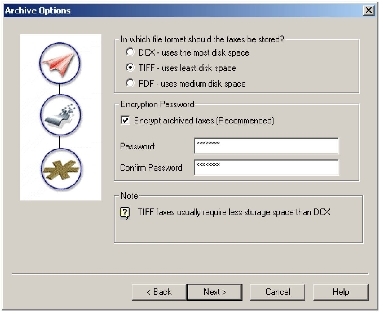
What file format should the faxes be stored: Options for file format include DCX, TIFF or PDF. The content of PDF files is not searchable or editable using the PDF's search and edit functions.
Encrypt archived faxes: Select this option to encrypt the archived faxes. Encryption prevents these files from being viewed without the proper password and decryption.
Password: Specify a password to be used in the encryption of the faxes. If you are using a Microsoft Access database to store the archived fax information, this password is also used to protect the Access database. The Access database file can be accessed by everyone with permission to the database directory. Specifying a password will prevent the entire contents of Access database from being viewed without the proper password. The password can only be specified once. It cannot be changed once the configurator is finished.
| 8. | The FaxPress Premier Archive Schedule window allows you to specify when and how often the Archive program will run. |
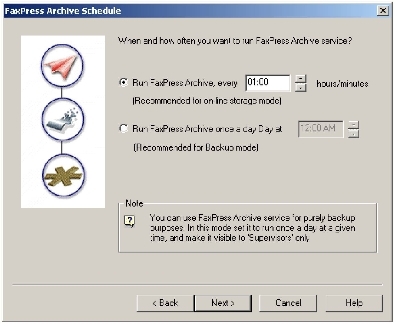
Run FaxPress Archive every - Choose this option to run the archive program periodically. The interval can be specified next to this option. Intervals are specified by hours and minutes. Choose an interval that is appropriate. The option is recommended when you have chosen to use the Archive in the All User View mode.
Run FaxPress Archive once a day at - Choose this option to run the archive program once a day. The time can be specified next to this option. Choose a time when there is minimal workload on the FaxPress server. This option is recommended if the Archive will be used in the Administrative View mode.
| 9. | The Archived Faxes Database Purge window lets you select options for the purging of old archived faxes. |
FaxPress Premier Archive automatically deletes archived faxes from the FaxPress Plus Queues. Purging of Archive faxes applies to faxes in both the Archived Transmitted or Received Faxes folder.
Purging should be enabled if the archived faxes are not required to be kept permanently or to prevent the database and disk space usage from growing too large. Purging will remove the records from the database and the actual fax files will be deleted.
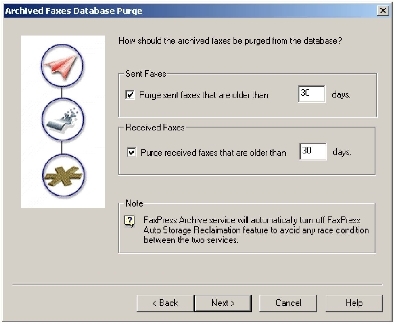
Purge Sent Faxes – Enable this option to purge sent faxes. All sent faxes older than the specified number of days will be deleted.
Purge Received Faxes – Enable this option to purge received faxes. All received faxes that are older than the number of days specified will be deleted. This will purge the records for all FaxPress users.
| 10. | The next two windows are information pages. Once the configurator is finished, the settings are saved to the registry and to the FaxPress Premier server. If a new Access database is selected, a new Access database is created with the archive tables. If an MS SQL server is selected, the tables are created in the default database. If the tables already exist in the database, then the tables are verified to ensure the correct format. The tables are also verified if an existing Access database is selected. If the Archive service is already running, it must be restarted for the changes to take effect. |
|
FaxPress Premier WebHelp
Last Updated: 11/1/2007
E-mail this page |
Castelle 855 Jarvis Drive, Suite 100 Morgan Hill, CA 95037 Toll-free 800.289.7555 Tel 408.852.8000 Fax 408.852.8100 |